プルリクのレビュー件数をグラフにしてみた
こんにちは、tkyです。
社内でプルリクをいろいろなメンバーにレビューしてもらっているのですが、
「最近特定の人ばかりにレビュー依頼してる気がする・・・負荷溜まってないかな・・・」
という一抹の不安をいだき誰にレビュー依頼するか判断する材料にしようと考え(完全に個人用で)作った感じです。
何作ったの
社内のメンバーのプルリク溜まってる件数をグラフにしてみました。
token, organization, teamを入力することでこんな感じのグラフが出るようなものです。
こうすることでレビュー溜まってない人にレビューアサインしたほうが早いかな?など検討の余地が生まれて良いですね。

技術的なところ
せっかくだしTypescriptとVueも一緒に触ってみながら成果物残してみるかー!というモチベーションです。 私はAndroidエンジニアですが、Reactとかのフロントの経験はあるのでそんなに抵抗はないです。
chart.jsのおかげでグラフ化はかんたんでした。感謝・・・
使ったAPI
大まかな流れは /orgs/:org_id/team/:team_id/members で特定のチームに属するメンバーを抽出して
そのメンバーが持っているPRレビューの数を /search/issues で取得します。
Search | GitHub Developer Guide
Team Members | GitHub Developer Guide
/search/issues の課題
search/issues?q=is:open+is:pr+review-requested:ticktakclock こんな感じで私がレビューすべきプルリクIssueが取得できるのですが、
review-requestedが1人しか指定できないのか、例えば
Aさん・・・2件、 Bさん・・・1件、 Cさん・・・4件
あったとして
search/issues?q=is:open+is:pr+review-requested:a-san+review-requested:b-san・・・3件取得search/issues?q=is:open+is:pr+review-requested:a-san+review-requested:c-san・・・0件取得
みたいなことがあってなぜか複数指定して検索できるパターンとできないパターンがあり
指定したメンバー全員を一気に検索することができなかったことです。
配列を一気にasync - await するのにはPromise.all()でくくってあげる必要がある、というのは本件に関係ありませんがそこそこ重要なポイントかなと思います。
      const res = await api(
        "/orgs/" + this.organization + "/teams/" + this.team + "/members"
      );
      const results: Array<RequestedReviewer> = await Promise.all(
        res.data.flatMap(async (user: User) => {
          const res = await api(
            "search/issues?q=is:open+is:pr+org:" +
              this.organization +
              "+archived:false" +
              "+review-requested:" +
              user.login +
              "&sort=created&order=asc&page=1&per_page=10"
          );
          return { user: user, issues: res.data.items };
        })
      );
これで何が問題かというとGitHubAPIのレート制限にすぐに引っかかるということです。
普通にtoken使ってやる場合は1時間あたり最大60件なので、比較的すぐに制限に引っかかります。
GitHub API v3 | GitHub Developer Guide
まとめ
- レビュー件数がわかって少し幸せ
- search apiもう少し拡張してほしい
- typescriptとVueの勉強しようと思ったのにGitHubAPIの勉強になってしまった・・・
こうすれば複数人のIssue検索できるよ、のような知見があるかたはぜひ教えていただきたいです!!
WebView android.view.InflateException on Lollipop
こんにちは、tkyです。
久々にWebViewで落ちた案件です。Lollipop(5.0)です。悲しみです。
手元にLollipopがないので実機で発生するかわからないのですが、Emulatorで発生するものです。
もしかしたらPlay Storeからandroid system webveiwのバージョンを上げるだけでも回避できる可能性は十分にあります。
E/AndroidRuntime: FATAL EXCEPTION: main

java.lang.RuntimeException: Unable to start activity ComponentInfo{com.your.packagename.UsingWebViewActivity}: android.view.InflateException: Binary XML file line #8: Error inflating class android.webkit.WebView
        at android.app.ActivityThread.performLaunchActivity(ActivityThread.java:2298)
        at android.app.ActivityThread.handleLaunchActivity(ActivityThread.java:2360)
        at android.app.ActivityThread.access$800(ActivityThread.java:144)
        at android.app.ActivityThread$H.handleMessage(ActivityThread.java:1278)
ぐぐると大体以下のような対策的なのが出てくるのですが、こんな事やっていなくても動いておりまして、はい。
override fun applyOverrideConfiguration(overrideConfiguration: Configuration?) {
    if (Build.VERSION.SDK_INT in 21..25) {
        return
    }
    super.applyOverrideConfiguration(overrideConfiguration)
}
この辺のstack overflowとissue見ると 1.0.2 では動いてるが、 1.1.0 で DayNight 系の機能実装のときにデグレったみたいでした。
一応この問題は 1.2.0-alpha02 で対応されているようで、Gradleを更新したらたしかにLollipop WebViewで落ちなくなりました。
implementation 'androidx.appcompat:appcompat:1.2.0-alpha02'
※この時Android Studioのリリースノートには 1.2.0-alpha01 までしか載っていなくてちょっとハマりました 🐥
そのAppCompat、バージョン上がってないですか?
動いていた時、appcompat1.0.2使っていたのですが(古)、問題が起こってたときもGradleは変えていませんでした。
+--- androidx.appcompat:appcompat:1.0.2
とある時期からなぜか1.1.0に依存更新されていたのです。
+--- androidx.appcompat:appcompat:1.0.2 -> 1.1.0
materialの更新で依存バージョンが上がっていた
+--- com.google.android.material:material:1.2.0-alpha04
| +--- androidx.appcompat:appcompat:1.1.0 (*)
僕の場合はMaterialの更新でたまたまappcompatのバージョンが上がって、デグレっていました。
どう回避するかはアプリ次第かと思われます。1.2.0-alpha02 のバージョンアップも多少リスクはあると思うので、プログラムで回避するのも一つの正解かと思われます。
implementation 'androidx.appcompat:appcompat:1.2.0-alpha02'
WebView使っているアプリを開発されている皆様は今一度AppCompatのバージョンとLollipopでの動作確認してみるとよいかもしれません!
以上です!
(追記)プログラムで回避する場合
ActivityにapplyOverrideConfigurationを実装してUI_MODE_NIGHT_MASKを除外するか
override fun applyOverrideConfiguration(overrideConfiguration: Configuration) {
    if (Build.VERSION.SDK_INT in Build.VERSION_CODES.LOLLIPOP..Build.VERSION_CODES.N_MR1) {
        overrideConfiguration.uiMode = overrideConfiguration.uiMode and Configuration.UI_MODE_NIGHT_MASK.inv()
    }
    super.applyOverrideConfiguration(overrideConfiguration)
}
AndroidManufest.xmlに uiMode のconfigurationChangedを付与するか
        <activity
            android:name=".UsingWebViewActivity"
            android:configChanges="uiMode" />
どちらかかなと思いました。バージョン上げるのにリスクある場合や、影響範囲を限りなく少なくしたい場合はプログラムで回避することも視野に入れて良いと思っています。
Kotlinのif elseとletとalso
こんにちは、tkyです。
Kotlinにおいてnullチェックしてそのインスタンスにアクセスする場合、?.let{} を使うことがわりと多いです。
しかしnullだったときの処理も記述する場合?.let{} だとどうしてもわかりづらくなる場合があり、素直にif elseを使ったほうが読みやすいのではないかな〜という思いから記事書いてみました。
いろいろなNullチェック手法
いくつか書いてみました。わかりやすくするために関数で書いています。
このケースならパターン2の早期リターンが一番効率的だと思いますが、
Androidでいうところの context? などフレームワークで定義されている変数はnullableなことがままあり、
そういったものであればパターン3( context?.let{} )で書くことが多いです。
private fun printMessageLength1(message: String?) {
    // パターン1 if文
    if (message != null) {
        println(message.length) // smart castにより安全にmessageにアクセス
    }
}

private fun printMessageLength2(message: String?) {
    // パターン2 エルビス演算子による早期リターン
    message ?: return
    println(message.length) // smart castにより安全にmessageにアクセス
}

private fun printMessageLength3(message: String?) {
    // パターン3 ?.letを使う
    message?.let {
         println(it.length)
    }
}

private fun printMessageLength4(message: String?) {
    // パターン4 ?.alsoを使う
    message?.also {
        println(it.length)
    }
}
nullだったときに別の処理をする場合
nullだったときに"message is null" と表示してみましょう。
private fun printMessageLength1(message: String?) {
    // パターン1 if文
    if (message != null) {
        println(message.length) // smart castにより安全にmessageにアクセス
    } else {
        println("message is null")
    }
}

private fun printMessageLength2(message: String?) {
    // パターン2 エルビス演算子による早期リターン 複数行あるのでrun{}で書く
    message ?: run {
        println("message is null")
        return
    }
    println(message.length) // smart castにより安全にmessageにアクセス
}

private fun printMessageLength3(message: String?) {
    // パターン3 ?.letを使う
    message?.let {
        println(it.length)
    } ?: println("message is null")
}

private fun printMessageLength4(message: String?) {
    // パターン4 ?.alsoを使う
    message?.also {
        println(it.length)
    } ?: println("message is null")
}
なお、エルビス演算子で複数行扱いたいとき run{} を使うことが多いかなと思います
    // 複数行処理したい場合はrun{}
    message?.let {
        println(it.length)
    } ?: run {
        println("message is null")
    }
let と also の違い
一見、パターン3とパターン4に違いが殆どないように感じます。が、違いは戻り値にあります。
public inline fun <T, R> T.let(block: (T) -> R): Rpublic inline fun <T> T.also(block: (T) -> Unit): T
引数として渡る値はどちらもTオブジェクト(今回の場合String?です,nullチェックされているのでStringです)
戻り値はletの場合任意に指定でき、alsoの場合Tオブジェクト(今回の場合String?です)
この前提を踏まえるとletの場合ちょっと問題が起こります。
printMessageLength3("hoge")

private fun printMessageLength3(message: String?) {
    message?.let {
        println(it.length)
        null
    } ?: run {
        println("message is null")
    }
}
出力
I/System.out: 4
I/System.out: message is null
messageがnon-nullなのに、let{}句内の記述内容によって動作が変化してしまうことです。
実際こんなコードを書くことはほぼないのですが、 fun doSomething(): String? のような関数がもし存在してlet内に記述されてしまったら
意図せぬところで不具合が起こることになります。
letとエルビス演算子の組み合わせ(?.let{} ?: run{} )はパット見問題なさそうに見えるが故にすぐに不具合に気づけない可能性も秘めているので
使うならalsoとエルビス演算子の組み合わせ(?.also{} ?: run{})が良いかなと思います。
まとめ
also 「また」は中学で習う英単語です。「AのほかにBもまた○○である」という表現で使われます。
message?.also{ // A}: run{ // B }
「メッセージがnullでなけばAもまた行う。」
ある物と別の物に対して言及するときに使うイメージがあるので若干違和感がありますね。。僕だけかな。。。
なので純粋に if(message != null) { //A } else { //B } と書いたほうが他の実装者に意図も伝えやすく不具合が起こりにくくなるのではないかな、ということを考えながらプログラミングしています。
logcatが出力されなくなった時の対処
こんにちは、tkyです。
既出小ネタ集です。
AndroidStudioで開発中たまにAS上のLogcatが出てこないときがあります。
    read: unexpected EOF!

    --------- beginning of crash
昔から対策自体はありますが、全体的に記載記事が古くなっている方に感じるので今でも使えるよっていう意味も込めて書いてます。
adbサーバを再起動する
$adb kill-server
$adb start-server
これでOKです。adbコマンドが使えない場合パスを通してください。(パスの通し方は割愛で!)
何が起こっているのか?
adbのプロセスから吐かれているエラーらしい。デバイスからよきせぬEOF(End Of File)が飛んできたためのクラッシュと読めます。
ワークアラウンド感が否めませんがadbサーバを再起動することで対処する感じです。
デバイスのバッファサイズが小さいと起こりやすい?バッファサイズを多めに設定しておくと発生頻度は少なくなるかもです。

Navigation SafeArgsを使って画面遷移でパラメータを渡す
こんにちは、tkyです。
前回はBottomNavigationとNavigationをあわせた画面遷移を作りましたが、パラメータを渡せないと実務では利用しづらいケースが多いと思います。
↓前回記事↓ ticktakclock.hatenablog.com
今回はSafe Argsの機能を使って次の画面にパラメータを渡すような実装を試してみたいと思います。
Home画面、Dashboard画面という単語が出てきますが、前回作ったアプリの画面をそのまま利用しているので前回記事を一読しておくと理解しやすいと思います。
今回の実装は前回のGitHubに追記しています。
Safe Argsできて何が嬉しいのか
ここで解決できることは、今までFragmentにnewInstance()でFragmentのインスタンスを作っていた関数が不要になり
companion object{
    fun newInstance(editName: String): DashboardFragment {
        val bundle = Bundle()
        bundle.putString("DETAIL_NAME", editName)
        return DashboardFragment().apply {
            arguments = bundle
        }
    }
}
このように記述できることにあると思います。
引数を含めたDestinationが型になるためActivityとFragmentを意識する必要がなくなる、contextも不要になることが大きなメリットです。
// 引数を含めたDestination
val destination =
    HomeFragmentDirections.actionNavigationHomeToNavigationDashboard(textValue)
findNavController().navigate(destination)
gradleへ追記
Safe Argsを利用するためにはNavigationの依存追加の他に、Project.gradleに以下を追加する必要があります。
    buildscript {
        repositories {
            google()
        }
        dependencies {
            def nav_version = "2.1.0"
            classpath "androidx.navigation:navigation-safe-args-gradle-plugin:$nav_version"
        }
    }
また、app.gradleに以下のプラグインを追加します。Kotlinだけのプロジェクトの場合の例です。
apply plugin: "androidx.navigation.safeargs.kotlin"
Java/Kotin混合プロジェクトの場合 apply plugin: "androidx.navigation.safeargs" となります。
Argumentの定義
Navigation Design上で確認していきましょう。HOME画面→Dashboard画面の遷移でDashboard画面でパラメータを受け取りたい場合、
DashboardのDestinationをクリックしてAttributesの中にあるArgumentsの+ボタンをクリックします。
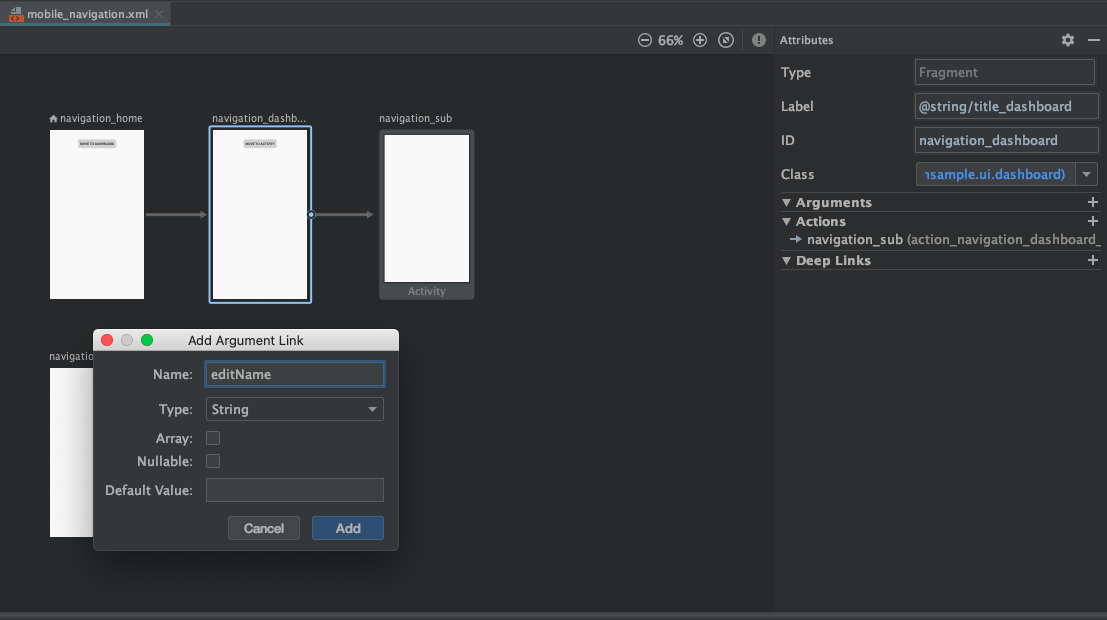
するとどのような引数を追加するか入力するダイアログが出てきますので、NameとTypeだけ入力してあとは何もせずでAddします。
- Name: editName
- Type: String
- Array: non checked
- Nullable: non checked
- Default Value: empty
これで完了です。xml上でも引数が追加されていることが確認できます。
<fragment
    android:id="@+id/navigation_dashboard"
    android:name="com.github.ticktakclock.bottomnavigationsample.ui.dashboard.DashboardFragment"
    android:label="@string/title_dashboard"
    tools:layout="@layout/fragment_dashboard">
    <!-- 中略 -->
    <argument
        android:name="editName"
        app:argType="string" />
</fragment>
argTypeについてはSerializableやParcelableなどの型も対応しているので独自データクラスなども対応できそうですね。良かったです。
詳細はこのページを見るとより深く理解できそうです。
遷移元処理
home画面にテキスト入力できるようにレイアウトを変更して、画面遷移時テキストの内容を遷移先に渡してみましょう。
HomeFragmentDirections.actionNavigationHomeToNavigationDashboard(editName: String) という遷移情報が自動で作られていることがわかります。
ここで作られたDestinationで画面遷移することになります。
val button: Button = root.findViewById(R.id.button)
button.setOnClickListener {
    val editText: EditText = root.findViewById(R.id.editText)
    val textValue = editText.text.toString()
    // 以前はリソースIDを直接指定していたが今回は引数を含めたDestinationを指定
    val destination =
        HomeFragmentDirections.actionNavigationHomeToNavigationDashboard(textValue)
    findNavController().navigate(destination)
//            findNavController().navigate(R.id.action_navigation_home_to_navigation_dashboard)
}
遷移先処理
Home画面から送った引数をDashboard画面で受け取ってみましょう。2種類方法があります(やってることは同じです)。
1つめは DashboardFragmentArgs.fromBundle()を使ってargumentsからDashboardFragmentArgsインスタンスを取得するやり方です。
arguments?.let {
    val args = DashboardFragmentArgs.fromBundle(it)
    val argsText: TextView = root.findViewById(R.id.text_args)
    argsText.text = args.editName
}
2つめは by navArgs() プロパティデリゲートを使ってDashboardFragmentArgsインスタンスを取得するやり方です。
private val args: DashboardFragmentArgs by navArgs()

override fun onCreateView(
    inflater: LayoutInflater,
    container: ViewGroup?,
    savedInstanceState: Bundle?
): View? {

val argsText: TextView = root.findViewById(R.id.text_args)
argsText.text = args.editName
    return root
}
1つ目はargumentsがBundle?型なので一度Nullチェックをする必要があります。nullだったときのことを考える必要があります。 この場合引数は必ず存在することが前提なのでBundleの状態不正としてIllegalStateExceptionをThrowして実装者に気づかせるのが最善かと思われます。
2つ目の方が公式ドキュメントでも解説されていたやり方となります。nullチェックする必要がなく、こちらのほうが記述量も少なくなって楽ですね。
navArgs()は何をしているのか
実は navArgs() デリゲートの中を見ると1つ目とやっていることは何も変わりませんでした。ライブラリ側にチェック処理を任せられるので実装ミスもなくなる観点からnavArgs()を使ったほうがメリットが大きそうです。
@MainThread
inline fun <reified Args : NavArgs> Fragment.navArgs() = NavArgsLazy(Args::class) {
    arguments ?: throw IllegalStateException("Fragment $this has null arguments")
}
この状態でHomeFragmentで findNavController().navigate(R.id.action_navigation_home_to_navigation_dashboard) で引数を与えないリソースIDのみで画面遷移しようとすると想定通り IllegalStateException が吐かれました
E/AndroidRuntime: FATAL EXCEPTION: main
    Process: com.github.ticktakclock.bottomnavigationsample, PID: 9503
    java.lang.IllegalStateException: Fragment DashboardFragment{d5e17c6 #1 id=0x7f08006c} has null arguments
        at com.github.ticktakclock.bottomnavigationsample.ui.dashboard.DashboardFragment$$special$$inlined$navArgs$1.invoke(FragmentNavArgsLazy.kt:42)
        at com.github.ticktakclock.bottomnavigationsample.ui.dashboard.DashboardFragment$$special$$inlined$navArgs$1.invoke(Unknown Source:0)
        at androidx.navigation.NavArgsLazy.getValue(NavArgsLazy.kt:44)
        at androidx.navigation.NavArgsLazy.getValue(NavArgsLazy.kt:34)
まとめ
- Safe Argsでを使うと Activity.createIntent(), Fragment.newInstance() といった関数が不要になる
- arg typsはSerializable, Parcelableも渡せるので独自クラスでも対応できる
navArgs()を使ってパラメータ取得すべし
Navigationでスマートな画面遷移を実現していきましょう〜!
あとは公式Doc見るのがよいです
Android Jetpack Navigationで画面遷移する
こんにちは、tkyです。
下タブ(BottomNavigation)とNavigationをあわせて画面遷移とアニメーションを実現するところまで実装してみようと思います。
Navigationがわからない人が
- AtivityとFragmentの画面遷移ができる
- アニメーションに必要なパラメータがわかる
なんとなくNavigationわかってきたくらいを目標に記事を書いています。
作ったプロジェクトはこちら
Navigation
公式ドキュメントも合わせて確認しながら理解していこうと思います。
Androidアプリ内の「目的地」間を移動するためのフレームワーク、とのことです。目的地はActivityでもFragmentでもどちらでも問題なく、一貫した呼び方ができるのが特徴のようです。
今まで画面遷移は activity.startActivity(Intent(this, FooDetailActivity::class.java)) だったり fragmentTransaction.replace(R.id.container, BarDetailFragment.newInstance() のように呼び方がActivity/Fragmentで異なりましたが、
Navigationを使用するとActivity/Fragment遷移関係なくfindNavController().navigate(R.id.navigation_home) のように統一されたIFなるみたいです。
AndroidStudioのプロジェクトテンプレート
実はプロジェクトテンプレートでBottomNavigationActivityを選択すれば手早くサンプルアプリが構築できるので使わない手はありません。早速作ってみます
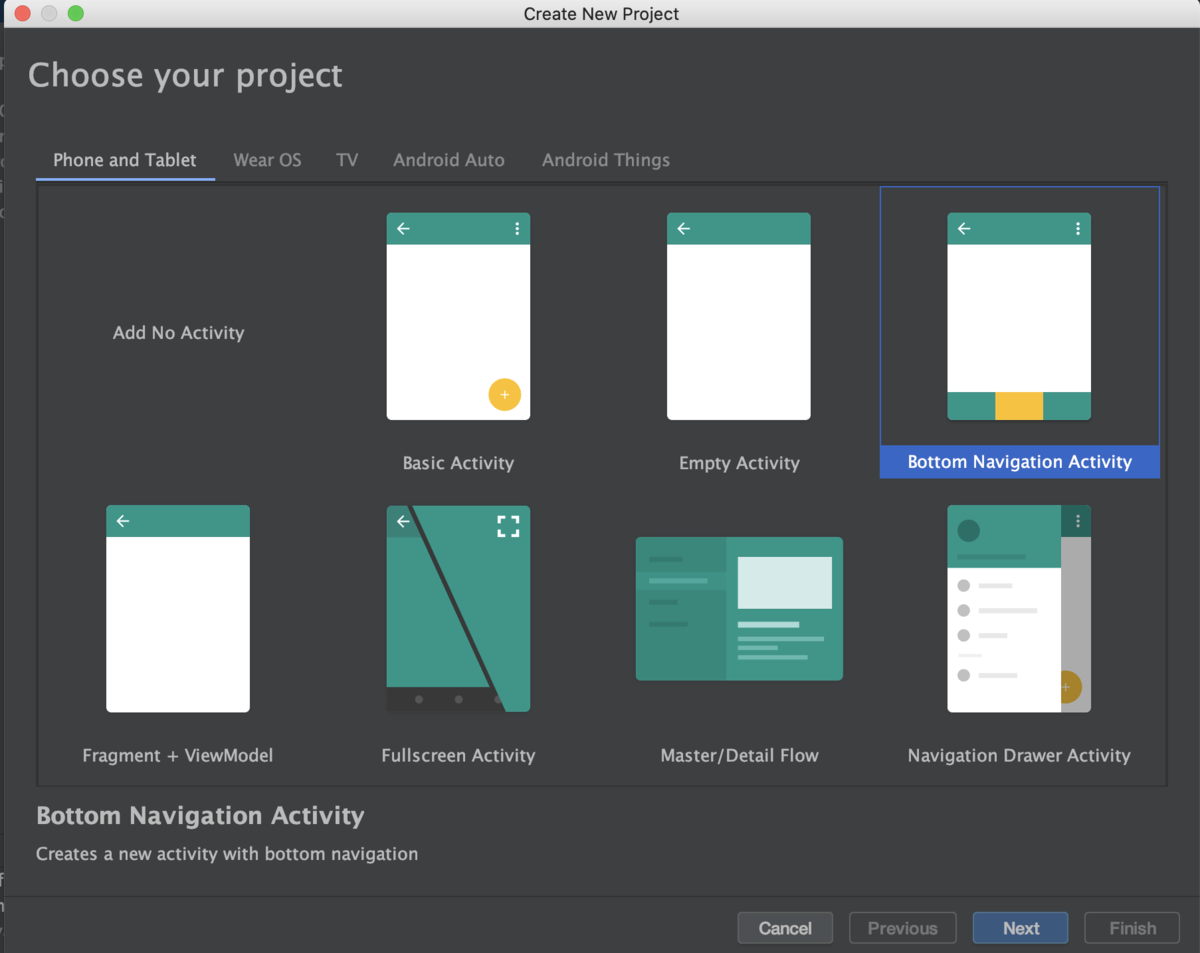
デフォルトでふわっとしたフェードアニメーションが付与されているのが確認できます。
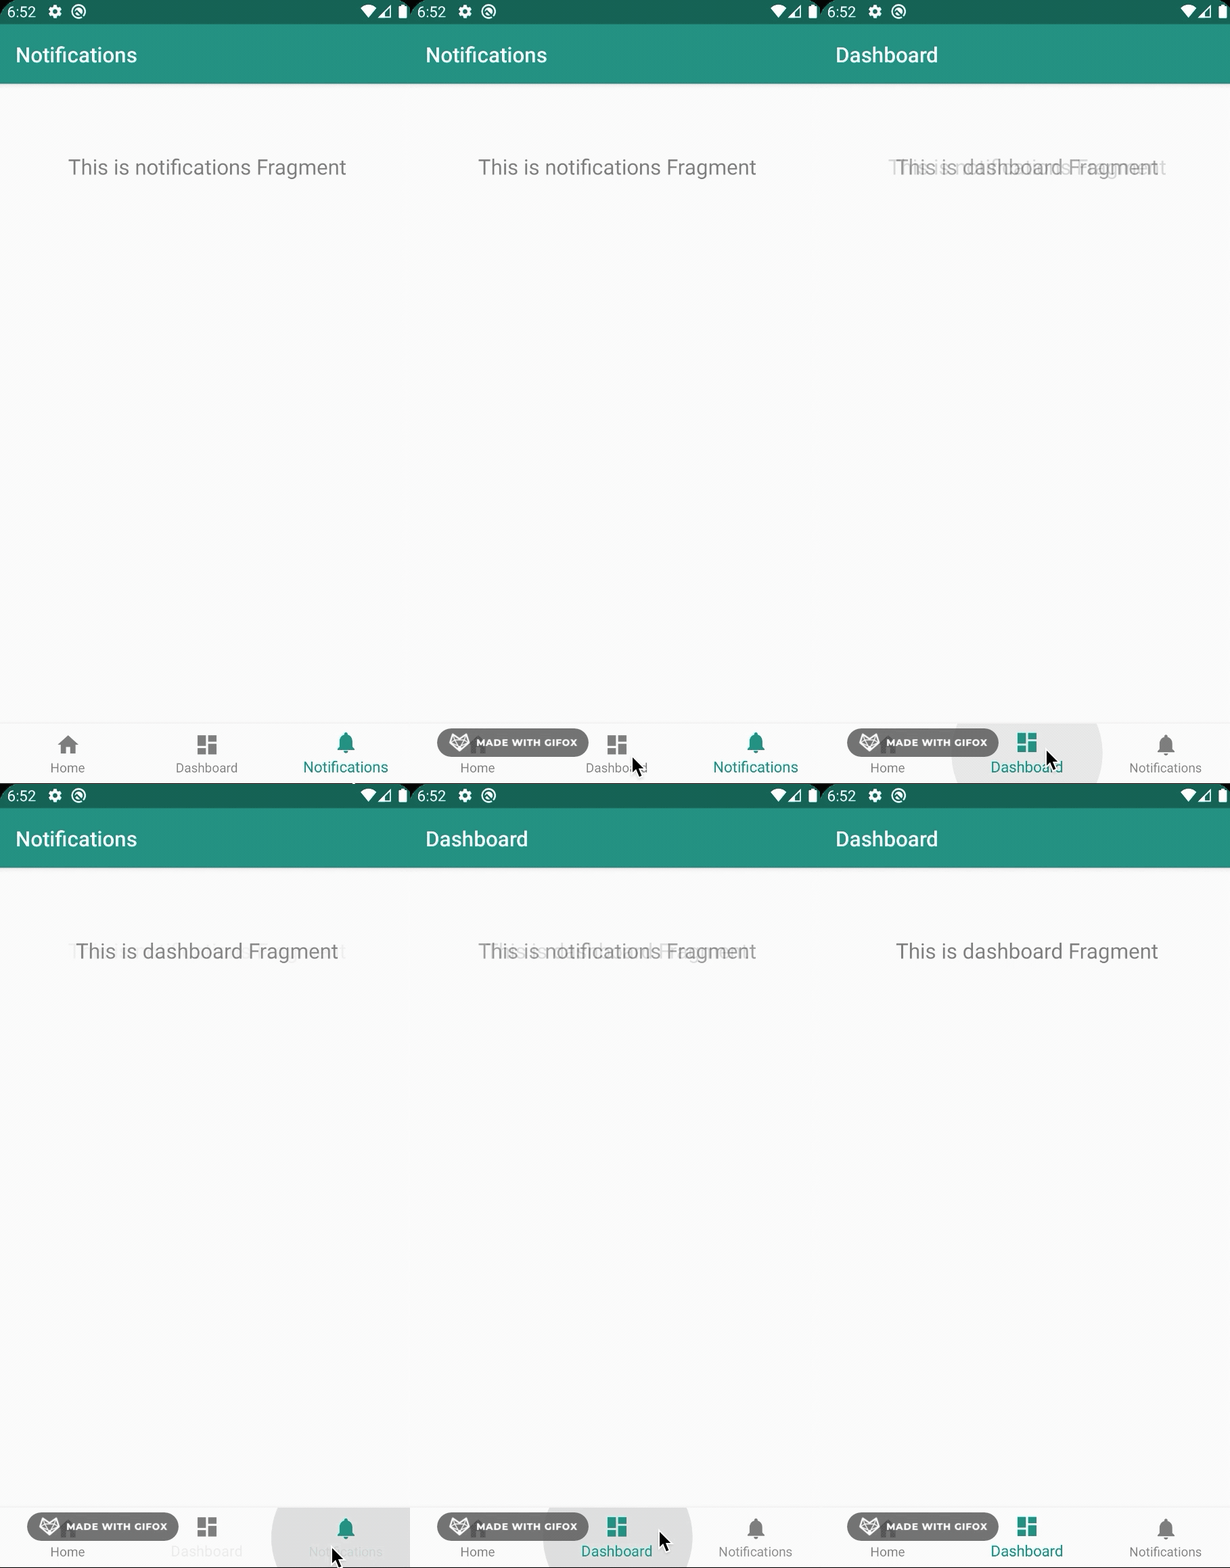
更に嬉しいのがViewModelまで作っておいてくれている親切設計。ありがたいですね
class NotificationsFragment : Fragment() {

    private lateinit var notificationsViewModel: NotificationsViewModel

    override fun onCreateView(
        inflater: LayoutInflater,
        container: ViewGroup?,
        savedInstanceState: Bundle?
    ): View? {
        notificationsViewModel =
            ViewModelProviders.of(this).get(NotificationsViewModel::class.java)
        val root = inflater.inflate(R.layout.fragment_notifications, container, false)
        val textView: TextView = root.findViewById(R.id.text_notifications)
        notificationsViewModel.text.observe(this, Observer {
            textView.text = it
        })
        return root
    }
}
class NotificationsViewModel : ViewModel() {

    private val _text = MutableLiveData<String>().apply {
        value = "This is notifications Fragment"
    }
    val text: LiveData<String> = _text
}
activity_main.xml
まずはActivityから理解を深めます。
BottomNavigationが配置されています。メニューは@menu/bottom_nav_menuで定義しています。Home,Dashboard,Notificationsが定義されているだけです。
    <com.google.android.material.bottomnavigation.BottomNavigationView
        android:id="@+id/nav_view"
        android:layout_width="0dp"
        android:layout_height="wrap_content"
        android:layout_marginStart="0dp"
        android:layout_marginEnd="0dp"
        android:background="?android:attr/windowBackground"
        app:layout_constraintBottom_toBottomOf="parent"
        app:layout_constraintLeft_toLeftOf="parent"
        app:layout_constraintRight_toRightOf="parent"
        app:menu="@menu/bottom_nav_menu" />

    <fragment
        android:id="@+id/nav_host_fragment"
        android:name="androidx.navigation.fragment.NavHostFragment"
        android:layout_width="match_parent"
        android:layout_height="match_parent"
        app:defaultNavHost="true"
        app:layout_constraintBottom_toTopOf="@id/nav_view"
        app:layout_constraintLeft_toLeftOf="parent"
        app:layout_constraintRight_toRightOf="parent"
        app:layout_constraintTop_toTopOf="parent"
        app:navGraph="@navigation/mobile_navigation" />
次に nav_host_fragment というFragment領域が定義されています。 androidx.navigation.fragment.NavHostFragment が実体のようです。
ドキュメントによると「NavHostはナビゲーション グラフからの宛先を表示する空のコンテナ。」ということらしいです。NavHostFragmentはNavHostインターフェースの実装クラスということですね。
一番下には app:navGraph="@navigation/mobile_navigation" の記述があります。ナビゲーショングラフと呼ばれ、ユーザが遷移可能なすべてのデスティネーション(遷移先/宛先)を指定します。
これでNavHostとナビゲーションを紐付けているわけですね。
MainActivity
        val navView: BottomNavigationView = findViewById(R.id.nav_view)

        val navController = findNavController(R.id.nav_host_fragment)
        // Passing each menu ID as a set of Ids because each
        // menu should be considered as top level destinations.
        val appBarConfiguration = AppBarConfiguration(
            setOf(
                R.id.navigation_home, R.id.navigation_dashboard, R.id.navigation_notifications
            )
        )
        setupActionBarWithNavController(navController, appBarConfiguration)
        navView.setupWithNavController(navController)
findNavController() は拡張関数です、ですのでJavaから呼ぶ場合は Navigation.findNavController(Activity, @IdRes int viewId) で呼ぶ必要があります。
続いてAppBarConfigurationですが表示している画面に合わせてAppBarの表示タイトルを変更するのに使っているぽいです。
コメントによると「メニューIDとナビゲーションのIDを一致させる必要がある」というような記述があります。 確認するとたしかにxml上でIDが一致していました。ここは知らないとハマりそうなポイントです。
MenuIdとNavigationIdが一致していれば、画面と画面名をAppBarと連携する必要がないならAppBarConfigurationの記述は省いても問題なさそうです。
後はメニューとNavitgationを関連付ける処理が入っている感じです。 メニューとNavigationを紐付けているのでドロワーメニューなどでも同様のやり方で画面遷移実現できそうです。
<?xml version="1.0" encoding="utf-8"?>
<navigation xmlns:android="http://schemas.android.com/apk/res/android"
    xmlns:app="http://schemas.android.com/apk/res-auto"
    xmlns:tools="http://schemas.android.com/tools"
    android:id="@+id/mobile_navigation"
    app:startDestination="@+id/navigation_home">

    <fragment
        android:id="@+id/navigation_home"   ★★★ここと★★★
        android:name="com.github.ticktakclock.bottomnavigationsample.ui.home.HomeFragment"
        android:label="@string/title_home"
        tools:layout="@layout/fragment_home" />

    <fragment
        android:id="@+id/navigation_dashboard"
        android:name="com.github.ticktakclock.bottomnavigationsample.ui.dashboard.DashboardFragment"
        android:label="@string/title_dashboard"
        tools:layout="@layout/fragment_dashboard" />

    <fragment
        android:id="@+id/navigation_notifications"
        android:name="com.github.ticktakclock.bottomnavigationsample.ui.notifications.NotificationsFragment"
        android:label="@string/title_notifications"
        tools:layout="@layout/fragment_notifications" />
</navigation>
<?xml version="1.0" encoding="utf-8"?>
<menu xmlns:android="http://schemas.android.com/apk/res/android">

    <item
        android:id="@+id/navigation_home"   ★★★ここのIDを一致させる必要がある★★★
        android:icon="@drawable/ic_home_black_24dp"
        android:title="@string/title_home" />

    <item
        android:id="@+id/navigation_dashboard"
        android:icon="@drawable/ic_dashboard_black_24dp"
        android:title="@string/title_dashboard" />

    <item
        android:id="@+id/navigation_notifications"
        android:icon="@drawable/ic_notifications_black_24dp"
        android:title="@string/title_notifications" />

</menu>
mobile_navigation.xml
先程登場したナビゲーションのxmlですがデザインモードというのがあって、グラフィカルに画面が表示されるモードがあります。
ここでnavigation_homeをクリックしたまま→navigation_dashboardにドラッグして線を引いてみます。 するとxml側にアクションが追加されます。アクションIDから「HomeはDashboardへの遷移アクションを持っている」というような文脈が想定できます
    <fragment
        android:id="@+id/navigation_home"
        android:name="com.github.ticktakclock.bottomnavigationsample.ui.home.HomeFragment"
        android:label="@string/title_home"
        tools:layout="@layout/fragment_home" >
        <action
            android:id="@+id/action_navigation_home_to_navigation_dashboard"
            app:destination="@+id/navigation_dashboard" />
    </fragment>
せっかくなのでHomeFragmentにButtonを追加して遷移してみましょう。
findNavController().navigate()はActionかDestinationのリソースIDを受けて画面遷移します。
class HomeFragment : Fragment() {

    private lateinit var homeViewModel: HomeViewModel

    override fun onCreateView(
        inflater: LayoutInflater,
        container: ViewGroup?,
        savedInstanceState: Bundle?
    ): View? {
        // 〜中略〜
        val button: Button = root.findViewById(R.id.button)
        button.setOnClickListener {
            findNavController().navigate(R.id.action_navigation_home_to_navigation_dashboard)
        }
        return root
    }
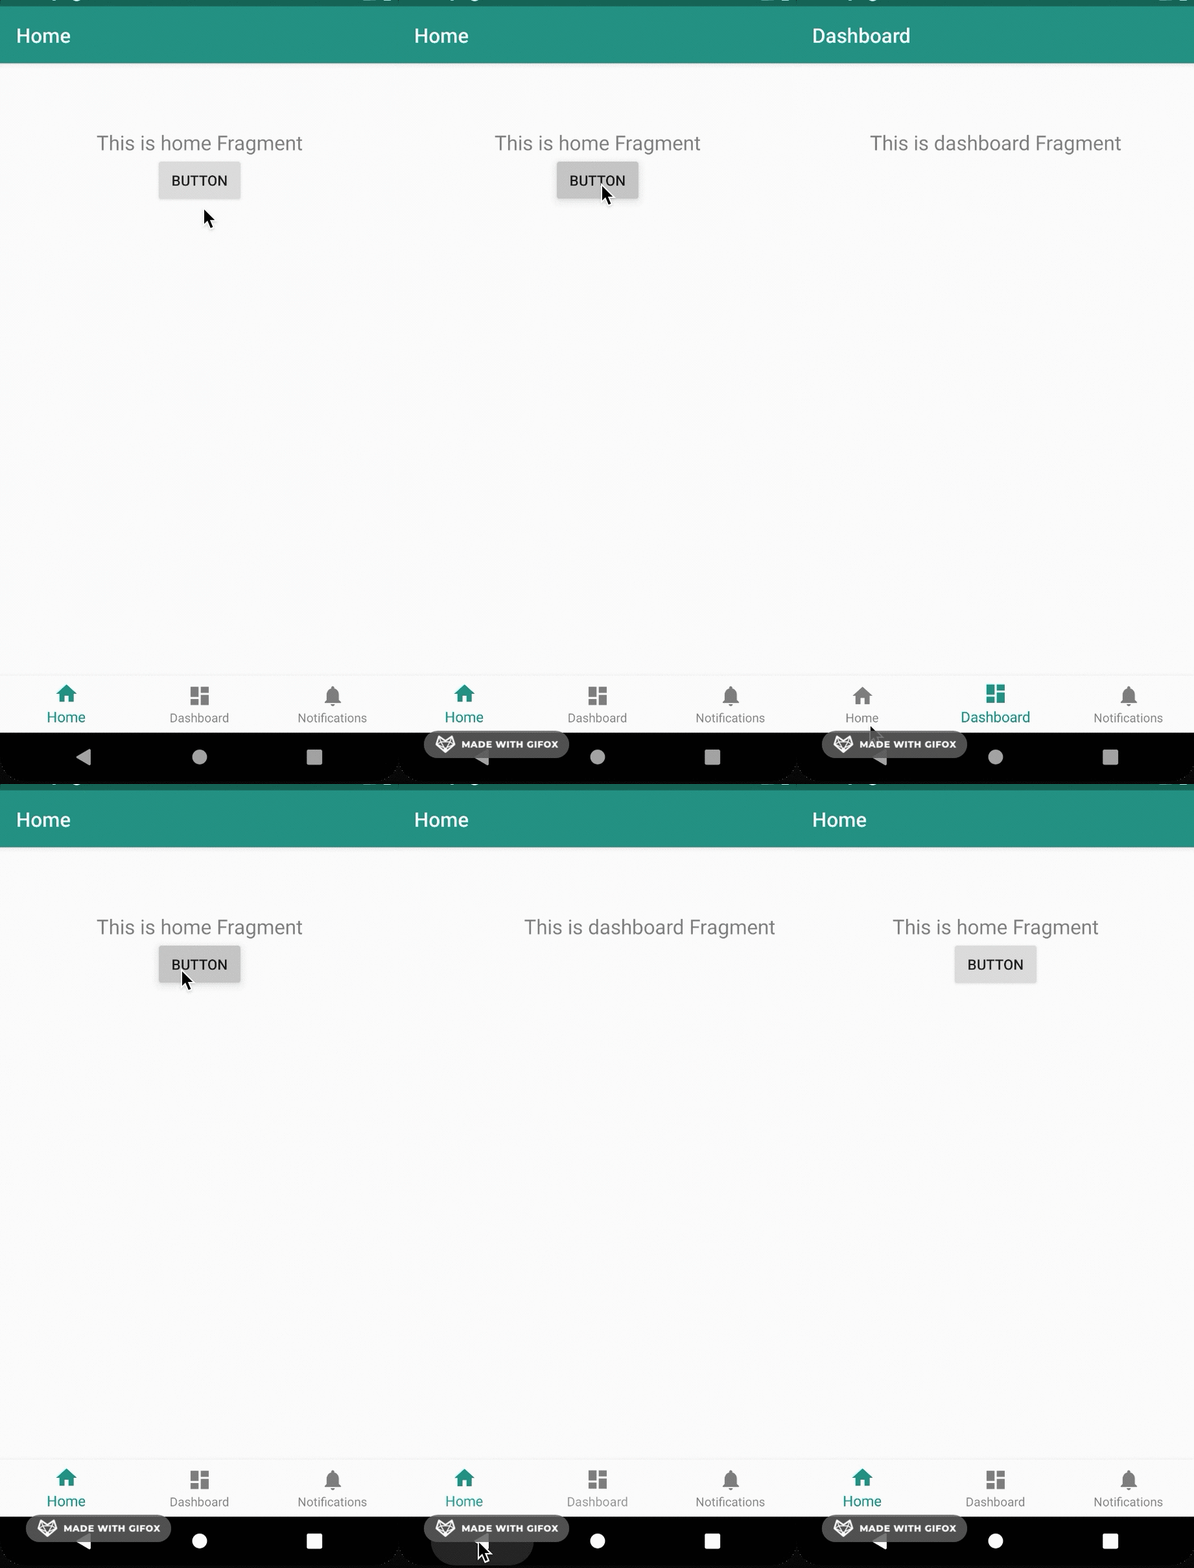
ボタンを押すとぱっと画面が切り替わることが確認できました。ここにはデフォルトのアニメーションは適用されないようです。
独自のアニメーションを実現するにはAnimationsを修正します。
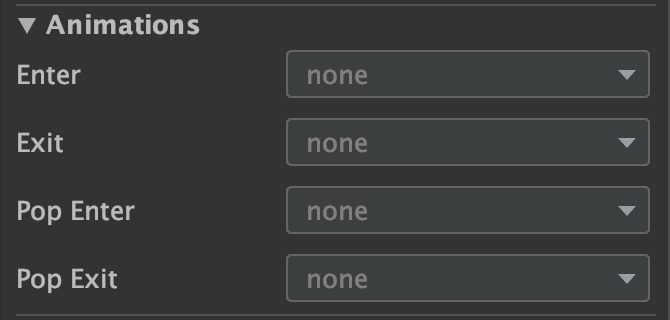
Home->Dashboardへの画面遷移の場合の各アニメーションの役割です
それぞれ
nav_side_enter.xml
<?xml version="1.0" encoding="utf-8"?>
<set xmlns:android="http://schemas.android.com/apk/res/android">
    <translate
        android:duration="@android:integer/config_mediumAnimTime"
        android:fromXDelta="100%p"
        android:toXDelta="0" />
</set>
nav_side_exit.xml
<set xmlns:android="http://schemas.android.com/apk/res/android">
    <translate
        android:duration="@android:integer/config_mediumAnimTime"
        android:fromXDelta="0"
        android:toXDelta="-100%p" />
</set>
nav_side_pop_enter.xml
<?xml version="1.0" encoding="utf-8"?>
<set xmlns:android="http://schemas.android.com/apk/res/android">
    <translate
        android:duration="@android:integer/config_mediumAnimTime"
        android:fromXDelta="-100%p"
        android:toXDelta="0" />
</set>
nav_side_pop_exit.xml
<?xml version="1.0" encoding="utf-8"?>
<set xmlns:android="http://schemas.android.com/apk/res/android">
    <translate
        android:duration="@android:integer/config_mediumAnimTime"
        android:fromXDelta="0"
        android:toXDelta="100%p" />
</set>
またナビゲーションは先程定義したアニメーションのIDを指定していきます。
    <fragment
        android:id="@+id/navigation_home"
        android:name="com.github.ticktakclock.bottomnavigationsample.ui.home.HomeFragment"
        android:label="@string/title_home"
        tools:layout="@layout/fragment_home" >
        <action
            android:id="@+id/action_navigation_home_to_navigation_dashboard"
            app:destination="@+id/navigation_dashboard"
            app:enterAnim="@anim/nav_side_enter"
            app:exitAnim="@anim/nav_side_exit"
            app:popEnterAnim="@anim/nav_side_pop_enter"
            app:popExitAnim="@anim/nav_side_pop_exit"/>
    </fragment>
こんな感じに動きました
Activityに遷移する
DashboardFragmentにボタンを追加してSubActivityに遷移するように作ってみます。

先ほどと同様にmobile_navigation.xmlには
    <fragment
        android:id="@+id/navigation_dashboard"
        android:name="com.github.ticktakclock.bottomnavigationsample.ui.dashboard.DashboardFragment"
        android:label="@string/title_dashboard"
        tools:layout="@layout/fragment_dashboard" >
        <action
            android:id="@+id/action_navigation_dashboard_to_navigation_sub"
            app:destination="@id/navigation_sub"
            app:enterAnim="@anim/nav_default_enter_anim"
            app:exitAnim="@anim/nav_default_exit_anim"
            app:popEnterAnim="@anim/nav_default_pop_enter_anim"
            app:popExitAnim="@anim/nav_default_pop_exit_anim" />
    </fragment>

    <activity
        android:id="@+id/navigation_sub"
        android:name="com.github.ticktakclock.bottomnavigationsample.SubActivity"
        android:label="@string/title_sub"
        tools:layout="@layout/activity_sub" />
FragmentでもActivityでも Action として画面遷移を定義しているのでActivitiyは遷移先がActivity/Fragmentどちらなのか意識することなく画面遷移できていることがわかります。
class DashboardFragment : Fragment() {

    private lateinit var dashboardViewModel: DashboardViewModel

    override fun onCreateView(
        inflater: LayoutInflater,
        container: ViewGroup?,
        savedInstanceState: Bundle?
    ): View? {
        // 〜中略〜
        val button: Button = root.findViewById(R.id.button)
        button.setOnClickListener {
            findNavController().navigate(R.id.action_navigation_dashboard_to_navigation_sub)
        }
        return root
    }
}
まとめ
- Navigationを使うと画面遷移を定義できる
- 画面遷移はActivity/Fragment意識することなく同じインターフェースで実現できる
- 遷移はActionを使い、遷移時のアニメーションも定義できる
次はSafeArgsを試してみようと思います。
→Next article ticktakclock.hatenablog.com
CoordinatorLayoutでMotionLayoutアニメーションを実現する(Android)
こんにちは、tkyです。
前回はMotionLayoutを使って実践で使えそうなアニメーションを実装しました。
今回も実践で使えそうなアニメーションを実装してみようと思います。
こちら

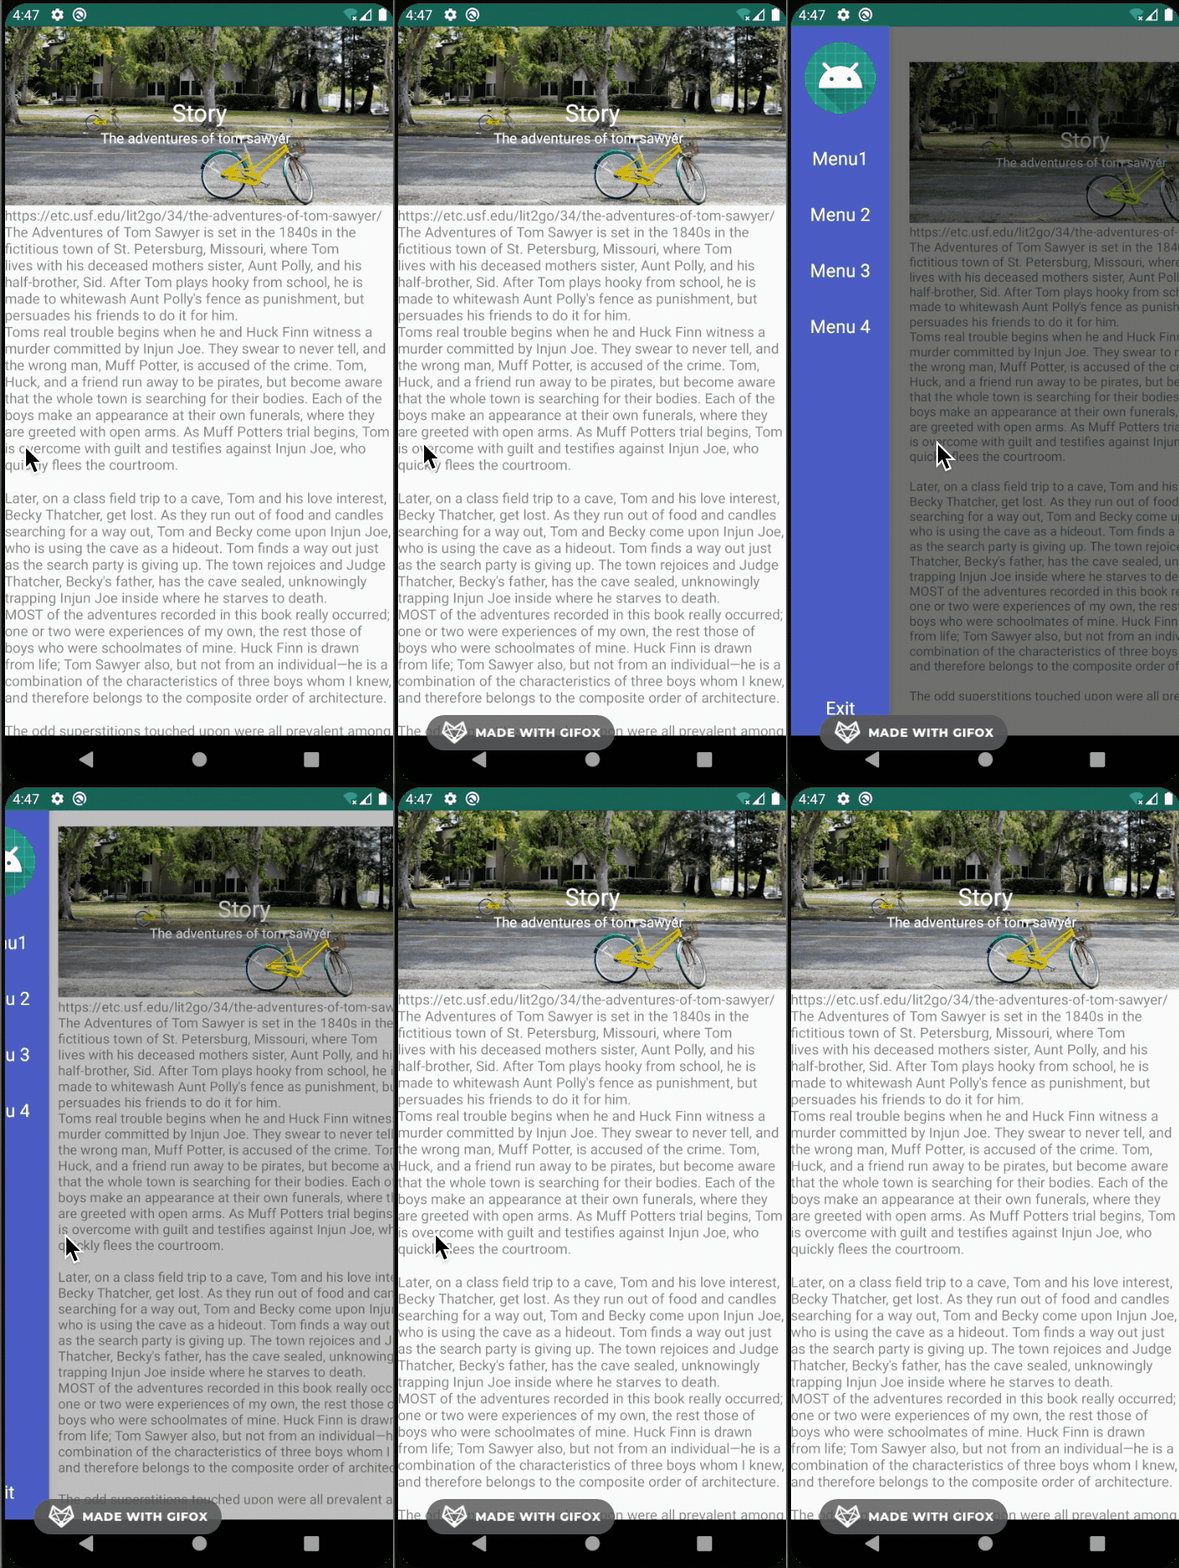
画面スクロール時にタイトルのテキストがアニメーションするようなMotionLayoutです。
前回同様のGitHubリポジトリとなります。 Sample10 をご確認ください。
レイアウト
CoordinatorLayoutなのでここは特に変わらずです。AppBarのレイアウト(layout/motion_10_header)が今回MotionLayoutに対応させることになります。
body側はただのTextViewなので特に触れません。GitHub参照ということで。。。
layout/motion_10.xml
<?xml version="1.0" encoding="utf-8"?>
<androidx.coordinatorlayout.widget.CoordinatorLayout xmlns:android="http://schemas.android.com/apk/res/android"
    android:id="@+id/content"
    android:layout_width="match_parent"
    android:layout_height="match_parent"
    android:fitsSystemWindows="false">

    <com.google.android.material.appbar.AppBarLayout
        android:id="@+id/app_bar"
        android:layout_width="match_parent"
        android:layout_height="180dp"
        android:theme="@style/AppTheme.AppBarOverlay">

        <include layout="@layout/motion_10_header" />

    </com.google.android.material.appbar.AppBarLayout>

    <include layout="@layout/motion_10_body" />

</androidx.coordinatorlayout.widget.CoordinatorLayout>
AppBar
これがMotionLayoutのレイアウトになりますが、ポイントは Sample10MotionLayout というMotionLayoutを継承したカスタムMotionLayoutクラスを使っているというところです。
Sample10MotionLayout については後述します。
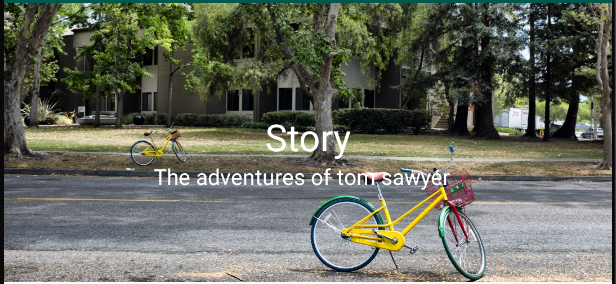
あとは表示したいUIを配置していきます。今回の場合、
- 背景に使うImageView(写真は適当に準備しています)
- タイトルTextView
- サブタイトルTextView
<?xml version="1.0" encoding="utf-8"?>
<com.github.ticktakclock.motionlayoutsample.Sample10MotionLayout
    xmlns:android="http://schemas.android.com/apk/res/android"
    xmlns:app="http://schemas.android.com/apk/res-auto"
    xmlns:tools="http://schemas.android.com/tools"
    tools:showPaths="true"
    android:id="@+id/motionLayout"
    android:layout_width="match_parent"
    android:layout_height="match_parent"
    android:minHeight="50dp"
    app:layoutDescription="@xml/scene_10"
    app:layout_scrollFlags="scroll|enterAlways|snap|exitUntilCollapsed">


    <ImageView
        android:id="@+id/background"
        android:layout_width="wrap_content"
        android:layout_height="wrap_content"
        android:scaleType="centerCrop"
        app:srcCompat="@drawable/public_domain_photo_2"
        tools:layout_editor_absoluteX="0dp"
        tools:layout_editor_absoluteY="0dp" />

    <TextView
        android:id="@+id/title"
        android:layout_width="wrap_content"
        android:layout_height="wrap_content"
        android:text="@string/sample_10_title"
        android:textColor="@android:color/white"
        android:textSize="24sp"
        tools:layout_editor_absoluteX="173dp"
        tools:layout_editor_absoluteY="263dp" />

    <TextView
        android:id="@+id/title_sub"
        android:layout_width="wrap_content"
        android:layout_height="wrap_content"
        android:text="@string/sample_10_sub_title"
        android:textColor="@android:color/white"
        tools:layout_editor_absoluteX="184dp"
        tools:layout_editor_absoluteY="348dp" />
</com.github.ticktakclock.motionlayoutsample.Sample10MotionLayout>
トリガー
やりたいことは「スクロールしたときにTextViewの位置を変更する」です。
スクロールは”縦のスワイプ”になるので motion:dragDirection="dragUp" でスクロールを実装します。ターゲットは背景画像にしておきます。
    <Transition
        motion:constraintSetEnd="@id/end"
        motion:constraintSetStart="@id/start"
        motion:duration="200"
        motion:motionInterpolator="linear">
        <OnSwipe
            motion:dragDirection="dragUp"
            motion:targetId="@id/background"
            motion:touchAnchorSide="bottom" />
    </Transition>
開始
@startにはAppBarが開いている状態の成約を指定していきます。
背景画像は見せておきたいので android:alpha="1" で表示状態にしておきます。
あとは通常通りタイトルTextViewは中央に来るように、サブタイトルTextViewはタイトルの下に来るように成約を設定します。
    <ConstraintSet android:id="@+id/start">
        <Constraint
            android:id="@id/background"
            android:alpha="1">
            <Layout
                android:layout_width="wrap_content"
                android:layout_height="wrap_content"
                motion:layout_constraintBottom_toBottomOf="parent"
                motion:layout_constraintEnd_toEndOf="parent"
                motion:layout_constraintStart_toStartOf="parent" />
        </Constraint>
        <Constraint android:id="@id/title">
            <Layout
                android:layout_width="wrap_content"
                android:layout_height="wrap_content"
                android:layout_marginBottom="8dp"
                motion:layout_constraintBottom_toBottomOf="@id/background"
                motion:layout_constraintEnd_toEndOf="parent"
                motion:layout_constraintStart_toStartOf="parent"
                motion:layout_constraintTop_toTopOf="@id/background" />
        </Constraint>
        <Constraint android:id="@id/title_sub">
            <Layout
                android:layout_width="wrap_content"
                android:layout_height="wrap_content"
                android:layout_marginEnd="8dp"
                motion:layout_constraintEnd_toEndOf="parent"
                motion:layout_constraintStart_toStartOf="parent"
                motion:layout_constraintTop_toBottomOf="@id/title" />
        </Constraint>
    </ConstraintSet>
終了
@endにはAppBarが閉じている状態の成約を指定していきます。
背景画像は見せなくて良いので android:alpha="0" で表示状態にしておきます。
スクロールした時にタイトルTextViewは左下、サブタイトルTextViewはタイトルの右横に配置します。

    <ConstraintSet android:id="@+id/end">
        <Constraint
            android:id="@id/background"
            android:alpha="0">
            <Layout
                android:layout_width="wrap_content"
                android:layout_height="wrap_content"
                motion:layout_constraintBottom_toBottomOf="parent" />
        </Constraint>
        <Constraint android:id="@id/title">
            <Layout
                android:layout_width="wrap_content"
                android:layout_height="wrap_content"
                android:layout_marginStart="8dp"
                android:layout_marginBottom="8dp"
                motion:layout_constraintBottom_toBottomOf="@id/background"
                motion:layout_constraintStart_toStartOf="parent" />
        </Constraint>
        <Constraint android:id="@id/title_sub">
            <Layout
                android:layout_width="wrap_content"
                android:layout_height="wrap_content"
                android:layout_marginStart="8dp"
                motion:layout_constraintBottom_toBottomOf="@id/title"
                motion:layout_constraintStart_toEndOf="@id/title"
                motion:layout_constraintTop_toTopOf="@id/title" />
        </Constraint>
    </ConstraintSet>
カスタムMotionLayoutについて
ここまでやれば普通であればスクロールでアニメーションできるのですが、残念ながらMotionLayoutクラスではアニメーションできませんでした。

アニメーションする際、MotionLayoutの progress 値が変化することでTransition発生することになりますが、AppBarのレイアウトの縦移動だけではMotionLayoutのこの値が変化することはないようです。
ということでMotionLayoutに AppBarLayout.OnOffsetChangedListener を実装してAppbarLayout で発生するoffsetをMotionLayoutのprogressに適用させることでTransitionの発生を促すようにチャレンジします。
class Sample10MotionLayout @JvmOverloads constructor(
    context: Context, attrs: AttributeSet? = null, defStyleAttr: Int = 0
) : MotionLayout(context, attrs, defStyleAttr), AppBarLayout.OnOffsetChangedListener {

    override fun onOffsetChanged(appBarLayout: AppBarLayout?, offset: Int) {
        val scrolled = appBarLayout?.totalScrollRange?.toFloat()
        progress = -offset / (appBarLayout?.totalScrollRange?.toFloat() ?: 0f)
    }

    override fun onAttachedToWindow() {
        super.onAttachedToWindow()
        (parent as? AppBarLayout)?.addOnOffsetChangedListener(this)
    }
}
これでスクロールでMotionLayoutのTransitionを効かせる事ができたのですが、もっと良い方法がないか模索したいところです。
まとめ
CoordinatorLayoutとMotionLayoutを組み合わせたアニメーションを実装してみました。
MotionLayoutを拡張してAppBarのoffsetをMotionLayoutのprogressに適用させることでアニメーションを実現しました。
どうしてもカスタムMotionLayoutが必要なのかはわかりませんが、もっと良い方法があれば是非教えていただきたいです。
発展
カスタムMotionLayoutのprogressをうまく使えば様々なケースでMotionLayoutを使えそうなことがわかったのでDrawerLayoutでも適用可能かと思われます。
詳しくはGitHubの Sample11 をご確認ください。
class Sample11MotionLayout @JvmOverloads constructor(
    context: Context, attrs: AttributeSet? = null, defStyleAttr: Int = 0
) : MotionLayout(context, attrs, defStyleAttr), DrawerLayout.DrawerListener {

    override fun onDrawerSlide(drawerView: View, slideOffset: Float) {
        progress = slideOffset
    }

    override fun onDrawerClosed(drawerView: View) {

    }

    override fun onDrawerOpened(drawerView: View) {

    }

    override fun onDrawerStateChanged(newState: Int) {

    }

    override fun onAttachedToWindow() {
        super.onAttachedToWindow()
        (parent as? DrawerLayout)?.addDrawerListener(this)
    }
}